Guest post by Paula Jakubik of Pixc
The quality of your product photography can make or break your eCommerce sales. Too many online store owners neglect their product images, believing that you need the skills and equipment of a pro to take great photos.
That’s definitely not the case – you just need a bit of practice and a good understanding of what makes a great product image. In this post, I’ll take you through some simple steps for shooting product photos, and give you a few tips on how to optimize your product photography for your eCommerce store!
Why is high-quality product photography important?
Humans are visual creatures and we’re drawn to images over text, which means that visitors to your eCommerce store will make their first impression based on how your store looks, and not what it says or sells. Through good design and an aesthetically pleasing color scheme are important, the key to good eCommerce visuals is your product images.
Nothing compares to being able to physically see and touch a product like you would in real life, so you’re going to need product images that show you’re confident in what you’re selling, so that the customer can be confident in what they’re buying.
5 steps for shooting product photos
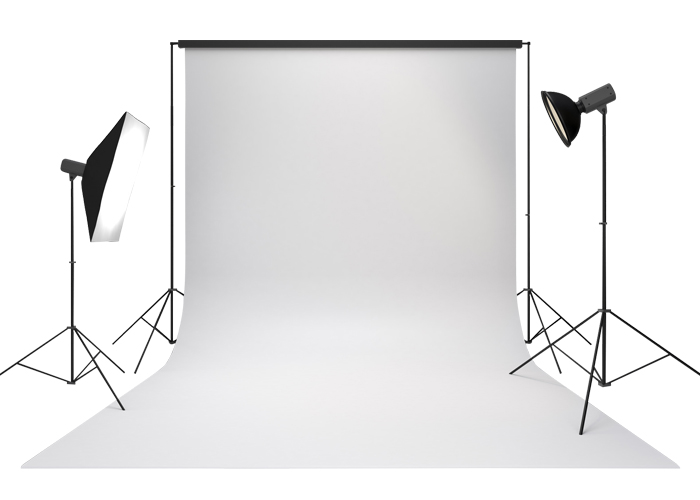
Step 1: Set up a white backdrop
Shooting on a white backdrop can make all the difference when it comes to product photography. Colored backdrops can cause color spills while dark backdrops will absorb all the light, leaving your products either too dark or over-exposed. A white backdrop, however, will reflect the light onto the product and give you a well-lit final image.
The white backdrop will also help with your camera’s white balance calibration. Light sources all have a different color temperature which our natural brains adjust to, but digital cameras need to guess what the true colors of things are based on a white element they pick out in the frame.
The best kind of white backdrop is a ‘sweep’, which you can easily make with a piece of paper or a clean white sheet. Attach it to a vertical surface, whether you use some kind of stand or just tape it to the wall, and let it fall so that it creates a seamless transition between the vertical and horizontal surfaces.
Step 2: Use sufficient light sources
Great lighting is the secret to great product photography.
The type of light isn’t as important as the amount of light – you can use anything from natural lighting, to desk lamps, to professional studio lighting, but there just needs to be enough lighting to light up the frame and product without the need for an external flash.
If you’re on a budget, natural lighting is the way to go. Keep in mind that natural lighting changes in color temperature and intensity as the day goes on, so it may not be the best option for you if you’re planning on doing a long photo shoot, simply because it’ll be difficult to achieve consistency amongst your product images and you’re limited to shooting when the sun’s out. However, it’s easy to use and calls for very little equipment.
A natural lighting set-up works best near a window, as you want to use the sun as an indirect light source. It should look something like the one in the diagram below: camera at the front, sweep at the back, product in the middle, and the window on one side.
It’s a good idea to create a fill light and place it on the other side of the product, opposite the window. This will reflect light onto the unlit side of your product, preventing harsh shadows and giving you an evenly-lit product.
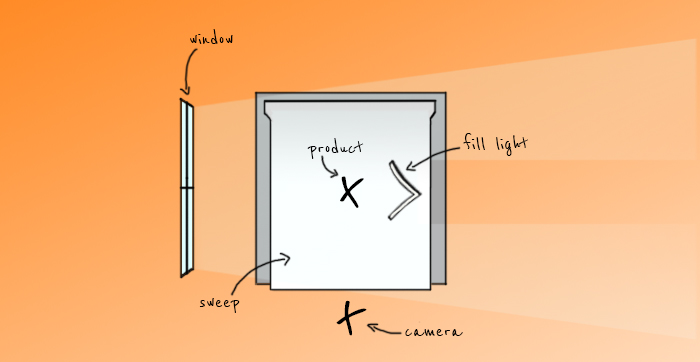
You can make one by folding a piece of white card in half and standing it up. Note that if you’re in a very bright room or there are windows on opposite walls, you probably won’t need a fill light.
Artificial lighting is more fiddly and costly, but will also give you great results. You can use basic spring clamps and clamp lamps from your local hardware store or desk lamps, but if you’re going to be shooting frequently, you can buy a basic studio lighting kit.
As with natural lighting, direct light will give you an over-exposed product or harsh shadows, so you’ll need to diffuse or reflect the light. If you’ve gone for a studio lighting kit, buy one that comes with softboxes or umbrella reflectors. If you’re making your own studio lights, use something white and translucent (like a white piece of paper or thin sheet) to cover the light heads.
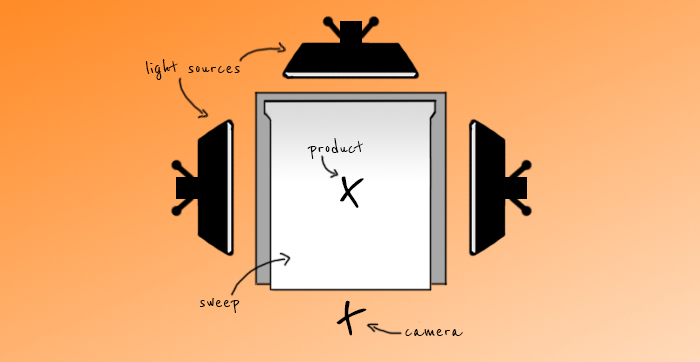
The set up should be similar to the diagram/photo below: camera at the front, sweep at the back, product in the middle, a light on each side directed at the product, and either a light in front of and below the product or above and behind the product.
The optimal position of the third light will depend on the type of lighting you have, the product, and the set-up, therefore you’ll need to experiment a little. This third light will give some dimension to your product and light up the entire frame.
Step 3: Stabilize your camera
For sharp product photos, you will need to stabilize your camera. You can use any hard, stable, and even surface but if you’re going to shoot regularly, you should purchase a tripod. Don’t spend a lot of money on a tripod – the pricey ones are definitely better but you won’t need the best tripod out there for product photography. It just needs to be steady enough to reduce the camera shake from you pressing down on the shutter.
Step 4: Get your camera ready
Position your camera so that the product is in the center of the frame and takes up the majority of the canvas; the sweep should fill up the rest of the frame. If you need to get closer to the product, physically move the tripod and camera or, if you’re using a DSLR, use the optical zoom (rotate the lens). Never use a digital zoom regardless of the device you’re using to shoot, as this will crop the photo as you take it and won’t give you great results.
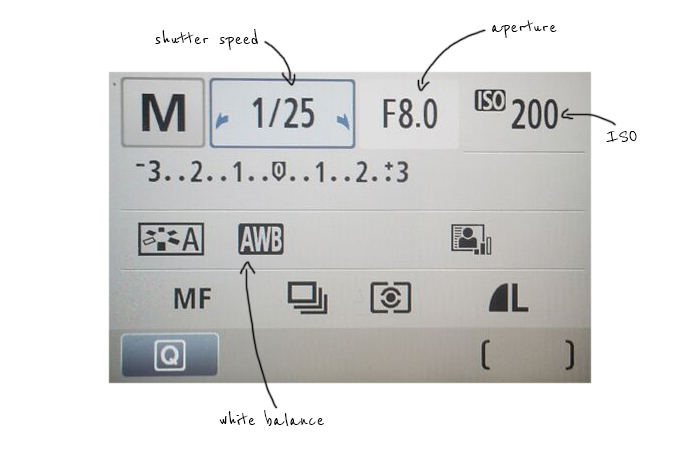
If you’re using a DSLR, you should take advantage of the advanced settings by shooting manual. Leave your white balance set to ‘AWB’ (auto white balance) and only play around with the ISO, aperture, and shutter speed.
Your aperture (the hole in the lens that determine the amount of light going into the camera) will affect how bright the photo is, and how much of the product is in focus. Aperture is measured in f-stops, and the larger the f-stop number, the smaller the aperture.
You want an aperture that’s small enough to capture the entire product without blurring the edges, but large enough to give you a well-lit image. I like to start with f/8 and go from there.
A small aperture like f/8 should be paired with a slow shutter speed (the speed at which the shutter opens and closes), because if your camera is letting in less light, the shutter needs to be open for longer.
Keep your ISO (the camera’s sensitivity to light) below 400. Anything above that will give you a ‘grainy’ image. To be able to shoot with an ISO of 100 or 200, you need sufficient light sources.
When you’re happy with your frame and settings, set a 2-second timer. This will give your camera enough time to stabilise itself after you’ve applied pressure onto the shutter.
Step 5: Take multiple photos
Now that you’re all set up, you’re ready to shoot. As the customer can’t physically see or touch the product, you’ll need to help them visualise it in their minds as best as you can. The easiest way to do this is to take multiple photos.
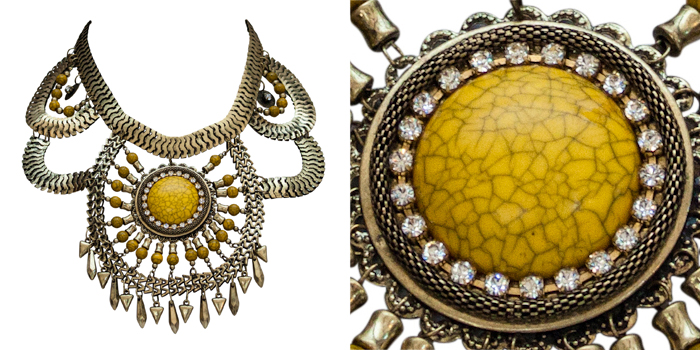
Take photos from different angles – front, back, above, below, the sides etc.
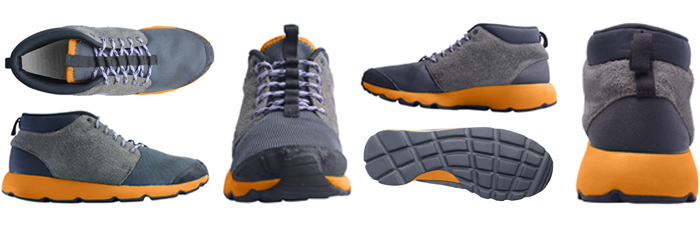
You should also take close-ups of special features or interesting textures. A lot of eCommerce storeowners overlook this step after they enable a zoom-function, but remember that the zoom function is controlled by the viewer; they choose where to click/hover and they move the mouse where they want to. Providing a close-up shows them where they should be looking.
Don’t just wing the product photography shoot – if you’re unprepared, it will take a lot longer than it needs to and you might miss certain products or photos. I’d suggest creating a list of all the products and shots you need, and grouping them by size so that you don’t have to adjust the set-up as frequently. Clean, polish, dust, shine, iron or whatever you need to do to make the products look perfect before you shoot. If you have an extra pair of hands, you can have someone prepare a product for shooting while you photograph the one before it.
Come back next Wednesday June 17 for Part 2: How To Optimize Your Product Photography For Your eCommerce Store
Guest post by Paula Jakubic of PIXC. Paula is the Community Manager at Pixc. You’ll often find her in the corner of a cafe in Sydney, blogging about eCommerce and helping online store owners with their product images.